

|
As in a telephone call, there are two roles you can play in order to
establish a connection:
The short version is as follows:
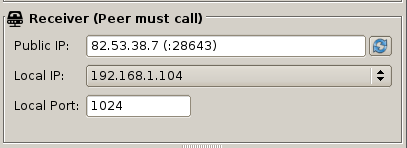
Receiver: fill in the Local IP and Local port fields and click the "receiver" button;
upon incoming call click "answer" on the popup dialog to accept.
Caller: fill in the Public IP and Public port fields and click the "call" button.
The tough part, however, is the Receiver, as it may have to deal with
network configuration.
Or (since version 1.1) you can use UDP hole punching.
Since this is probably the main criticism in peer-to-peer applications,
and we can rely only on ourselves (remember: no server in the middle!),
I'll try to put it very simple in the next paragraphs.
Contents of this section:
|
Think of ViaVoip as your home telephone.
To get called you'd give your phone-number, don't you?
Well in computer networks a "phone-number" is a pair value made up of:
- IP address or just IP: uniquely identify a computer (or any other network-enabled device) in a network;
- port number or just port: uniquely identify a program in a computer.
All programs that need a network connections must have a port assigned.
Think as IP was the company-number, and port the extension.
IP addresses are usually written and displayed in human-readable notations,
such as 192.168.10.1 (each of the 4 dot separated numbers can range from 0 to 255).
Port numbers can range from 0 to 65535, but usually 0 to 1023 are reserved by your operative system
and you can use from 1024 up.
The IP and port pair is usually written consecutively, separated by a colon, such as
192.168.10.1:1024.
Here is a working example on a LAN (Local Area Network), i.e. your home or office network:
192.168.10.1:1024 <-> 192.168.10.2:1024
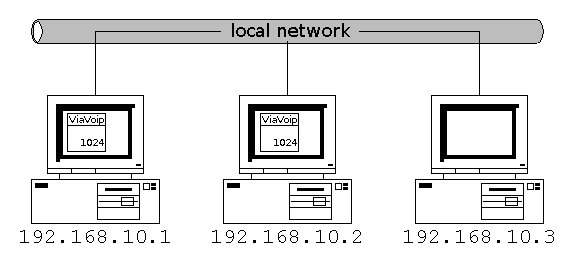
So far so good: your Local IP and Local port is all your peer needs to know to call you
if she's inside your LAN.
To go on with the phone example, if your peer lived outside your town than she would prefix
your number with your area code, right?
If you connect to the internet through a router/gateway and your peer is outside
your local network, she's considered out of town; and what is the area-code prefix equivalent
in a computer network? The router Public IP address.
You got it: routers have two different IP's, and you can only see the one
on your side of the network.
- Public IP: this is the only IP visible outside your local network
- Private or Local IP: this is your router IP inside your local network.
So, to get called, you'd just give your Public IP address and your Local IP
and Local port.
But unfortunately, everything is inside your local network is unreachable from the outside.
And here's where NAT (Network Address Translation) comes into action:
routers have port numbers as well, and you can map a router Public Port
to an Local IP:port pair in your local network,
thus letting your peer think calling you at Public IP:port,
but in fact forwarding it to your Local IP:port.
192.168.0.10:1024 <- 85.10.58.63:1024 <-> 72.248.26.116:1024 -> 192.168.1.100:1024
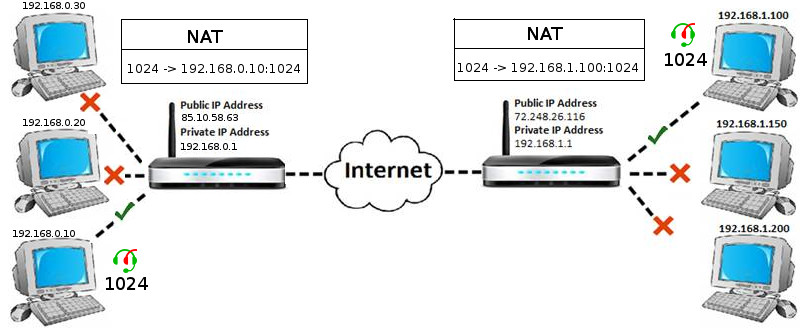
That is sort of unbalanced, one (router) against n (computers): the router has port range from 0 to 65535,
as each of any computer in the LAN, if all needs a few thousands ports mapped, the router could easily run out
of available ports...Correct, but very unlikely though: in real life only very few ports needs to be mapped,
just those that must accept incoming connections. For example? Emule, Torrent and...ViaVoip
(only when it wants to run as Receiver).
So, let's see now how to configure NAT.
NAT configuration varies from router to router, but basically all you have to do
is open your browser and navigate to your router administration page.
Here is a real life example:
on the first line you can see I have forwarded my routers Public port 1024 to my
laptop at Local IP 192.168.1.104 on Local port 1024;
Both TCP and UDP protocol must be forwarded to the same port
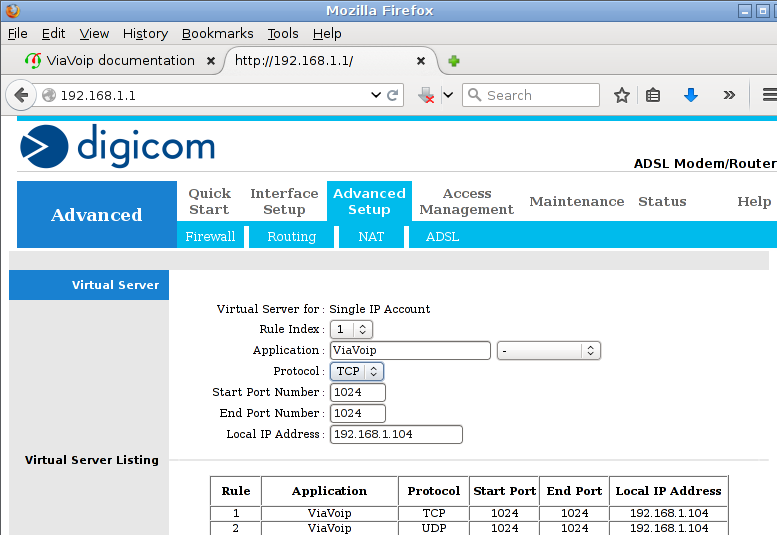
Guessed it: my router Local IP is 192.168.1.1. That is exactly what I put on my browser
address bar. To find out what is yours, open up a terminal:
- Windows: goto Start menu -> run and type 'cmd';
- Mac OS X: open Finder and go to Applications/Utilities and run 'Terminal';
- Linux: you should now!
- Android: I don't know!
and type:
- Linux & Mac OS X:
ip route or route -n
- Windows:
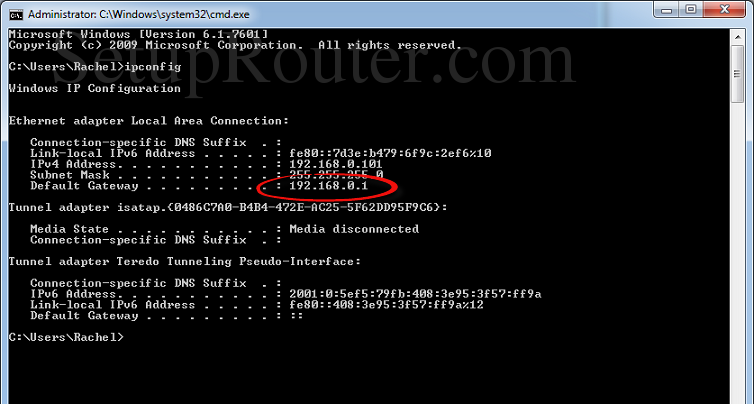
ipconfig
Here is what number you need to pick up on windows:
Finally, to know your Public IP address there's no way but asking an external service
for reporting it back to you. There are a lots of sites offering it,
but to avoid you this pain ViaVoip does it for you, querying this
Public IP discovery service
and filling up the Receiver's "Public IP" field with the response.
We'll see this in more details in the next paragraph (feut!).
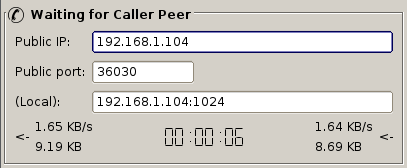
Just fill in the Public IP and Public port fields
as instructed by your Receiver peer and click on the
Call  button. button.
The (Local) field shows your current local end point (ip:port) (if you are
the caller you don't choose your local port, but the system picks this one up for you).
Below the (local) field you can see starting from the left:
- outgoing bit rate / total bytes sent;
- call duration;
- incoming bit rate / total bytes received;
So what if you can't (or don't feel like) configuring the router you connect through?
Whe can exploit the routers algorithm that, whenever you make an outgoing request
(i.e. browsing a remote web page) maps dynamically a random port to the LAN endpoint (IP:port)
that made the request, and sends it back any incoming response.
This technique is better implemented over the UDP protocol.
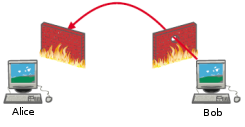
When Bob wants to receive data from Alice, he sends any data to her remote port, even if
Alice's firewall will reject this data (left picture).
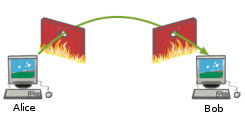
But if straight after Alice sends some data to Bob's remote port,
Bob's router will think this is the response coming from Alice, and will let her in (right picture)!
As there is a timing issue (i.e. Alice's data reach Bob's router before Bob's has sent any data)
this can imply a few try from both sides.
The same apply viceversa, so Bob can also send data to Alice.
And with the same mechanism, after a few try, Alice will be able to send and receive data from Bob.
ViaVoip always uses two ports to operate: one for data and
the other for audio-stream.
While the audio port always rely on the the UDP protocol,
the data port used previously (when using NAT) uses the TCP protocol (thus allowing
to use the same port number).
To exploit UDP hole punching, thought, also the data port must rely on UDP,
so we need to specify another UDP port number,
as visible by the new text field that will show-up when changing settings (see below).
As soon as you click the Connect button in "UDP hole punching mode", ViaVoip
will start trying to connect to the remote endpoint as explained before, and the
connection will be active as soon as it has verified to be able
to send and receive data from its peer.
As before, as we don't rely on any central server, to establish a connection
you must first know your public ports number and tell your peer.
For this you can use any public STUN (Session Traversal Utilities for NAT) server:
Go to settings  ,
and check the <UDP hole punching> option one time for receiver or two times for caller,
(you must agree with your peer, please read the bottom note),
and pick a server from the list ,
and check the <UDP hole punching> option one time for receiver or two times for caller,
(you must agree with your peer, please read the bottom note),
and pick a server from the list
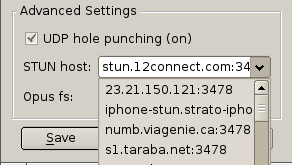
then choose two local ports and click the refresh button

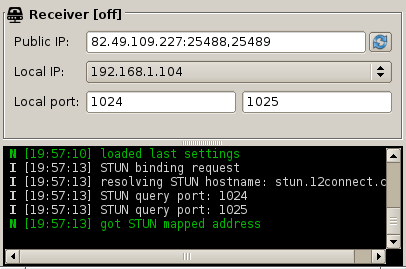
and tell your peer what you read in the "Public IP" field [IP:port1,port2]
by any other means (you can copy/paste the full text in a message).
Then fill in the equivalent fields in the caller section with your peer's info
(you can paste the full [IP:port1,port2] text via the "paste"
 button) button)
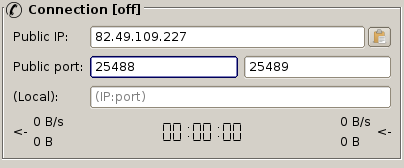
Now click the Call  button and wait...good luck! button and wait...good luck!
![]()
Note that in this case BOTH peers must click the Call button,
while the Receiver must be off,
as there is no caller/receiver role during connection.
Nevertheless, for some program internal logic (i.e. when sending negotiation messages),
this roles have to be defined, so in the settings section,
the <UDP hole punching> option has three states:
- (off): using the NAT method
- (on [receiver]): UDP punching on as receiver
- (on [caller]): UDP punching on as caller
and you must agree this with your peer
(one must play the caller and the other the receiver role).
back to manual index
next manual section: audio
|

